Overview
By the end of this guide, you’ll have an Intuned project (+ scraping Job with R2 sink) that sends scraped data directly to Cloudflare R2. You’ll:- Create an R2 bucket and configure credentials for Intuned.
- Configure a Job with an R2 sink.
- Trigger a Job and verify data lands in R2.
Prerequisites
Before you begin, ensure you have the following:- A Cloudflare account with R2 access.
- An Intuned account.
This guide assumes you have a basic understanding of Intuned Projects and Jobs. If you’re new to Intuned, start with the getting started guide.
When to use R2 integration
Scrapers built on Intuned typically run via Jobs on a schedule. When a JobRun completes, you want that data sent somewhere for processing or persistence. R2 integration automatically delivers scraped data to your R2 bucket as JSON files. From there, you can process results using Cloudflare Workers at the edge—or connect to other services. R2’s zero egress fees make it ideal for frequent data access.While this guide focuses on scraping, R2 integration works for any Intuned Job—the files sent to R2 are Run results from any automation.
Guide
1. Create an R2 bucket and access credentials
Create an R2 bucket and API credentials that Intuned can use to write data:Create an R2 bucket
- Log in to the Cloudflare Dashboard
- Navigate to Storage & databases > R2 object storage > Overview from the sidebar
- Select Create bucket
- Enter a bucket name (e.g.,
my-intuned-scraper-data) - Select Create bucket
Get your Cloudflare Account ID
Your Account ID is needed to construct the R2 endpoint URL:
- In the Cloudflare dashboard, look at the URL - it contains your Account ID
- The URL format is:
https://dash.cloudflare.com/<account-id>/r2 - Copy your Account ID (the alphanumeric string)
- Your R2 endpoint will be:
https://<account-id>.r2.cloudflarestorage.com
Your Account ID is also visible in the sidebar of the Cloudflare dashboard under your account name.
Generate R2 API token
Create API credentials for Intuned to access your R2 bucket:
- In the Storage & databases > R2 object storage > Overview section, select Manage Tokens
- Select Create Account API Token
- Configure the token:
- Token name: Enter
intuned-r2-writer - Permissions: Select Object Read & Write
- TTL: Leave as default or set a custom expiration
- Bucket scope: Select your specific bucket or choose All buckets
- Token name: Enter
- Select Create Account API Token
- Copy both the Access Key ID and Secret Access Key immediately
Note your configuration details
You now have everything needed to connect Intuned to R2. Save these details:
- Bucket name: Your R2 bucket name
- Account ID: From the Cloudflare dashboard URL
- Endpoint:
https://<account-id>.r2.cloudflarestorage.com - Access Key ID: From the API token
- Secret Access Key: From the API token
2. Configure a Job with an R2 sink
Prepare a project
You can use an existing project or create a new one.For this example, we’ll use the
ecommerce-scraper-quickstart project that you can deploy using the Deploy your first scraper quickstart tutorial.Create a Job with an R2 sink
- Dashboard
- TypeScript SDK
- Python SDK
- Go to app.intuned.io
- Open your
ecommerce-scraper-quickstartproject - Select the Jobs tab
- Select Create Job
- Fill in the Job ID and payloads
- Set Job ID to:
default-with-r2 - Set payload api to
listand empty parameter object{}
- Enable sink configuration and add your R2 details with the details from the previous section:
- Type:
s3(R2 uses S3-compatible API) - Bucket: Your R2 bucket name (e.g.,
my-intuned-scraper-data) - Region: Set to any value (R2 is zone-agnostic) (e.g.,
auto) - Endpoint:
https://<your-account-id>.r2.cloudflarestorage.com - Access Key ID: Your R2 API token access key
- Secret Access Key: Your R2 API token secret key
- Force Path Style:
true(required for R2) - Prefix (optional): A path prefix to organize files (e.g.,
ecommerce-data/) - Skip On Fail (optional): Check to skip writing failed Runs to R2
- Type:
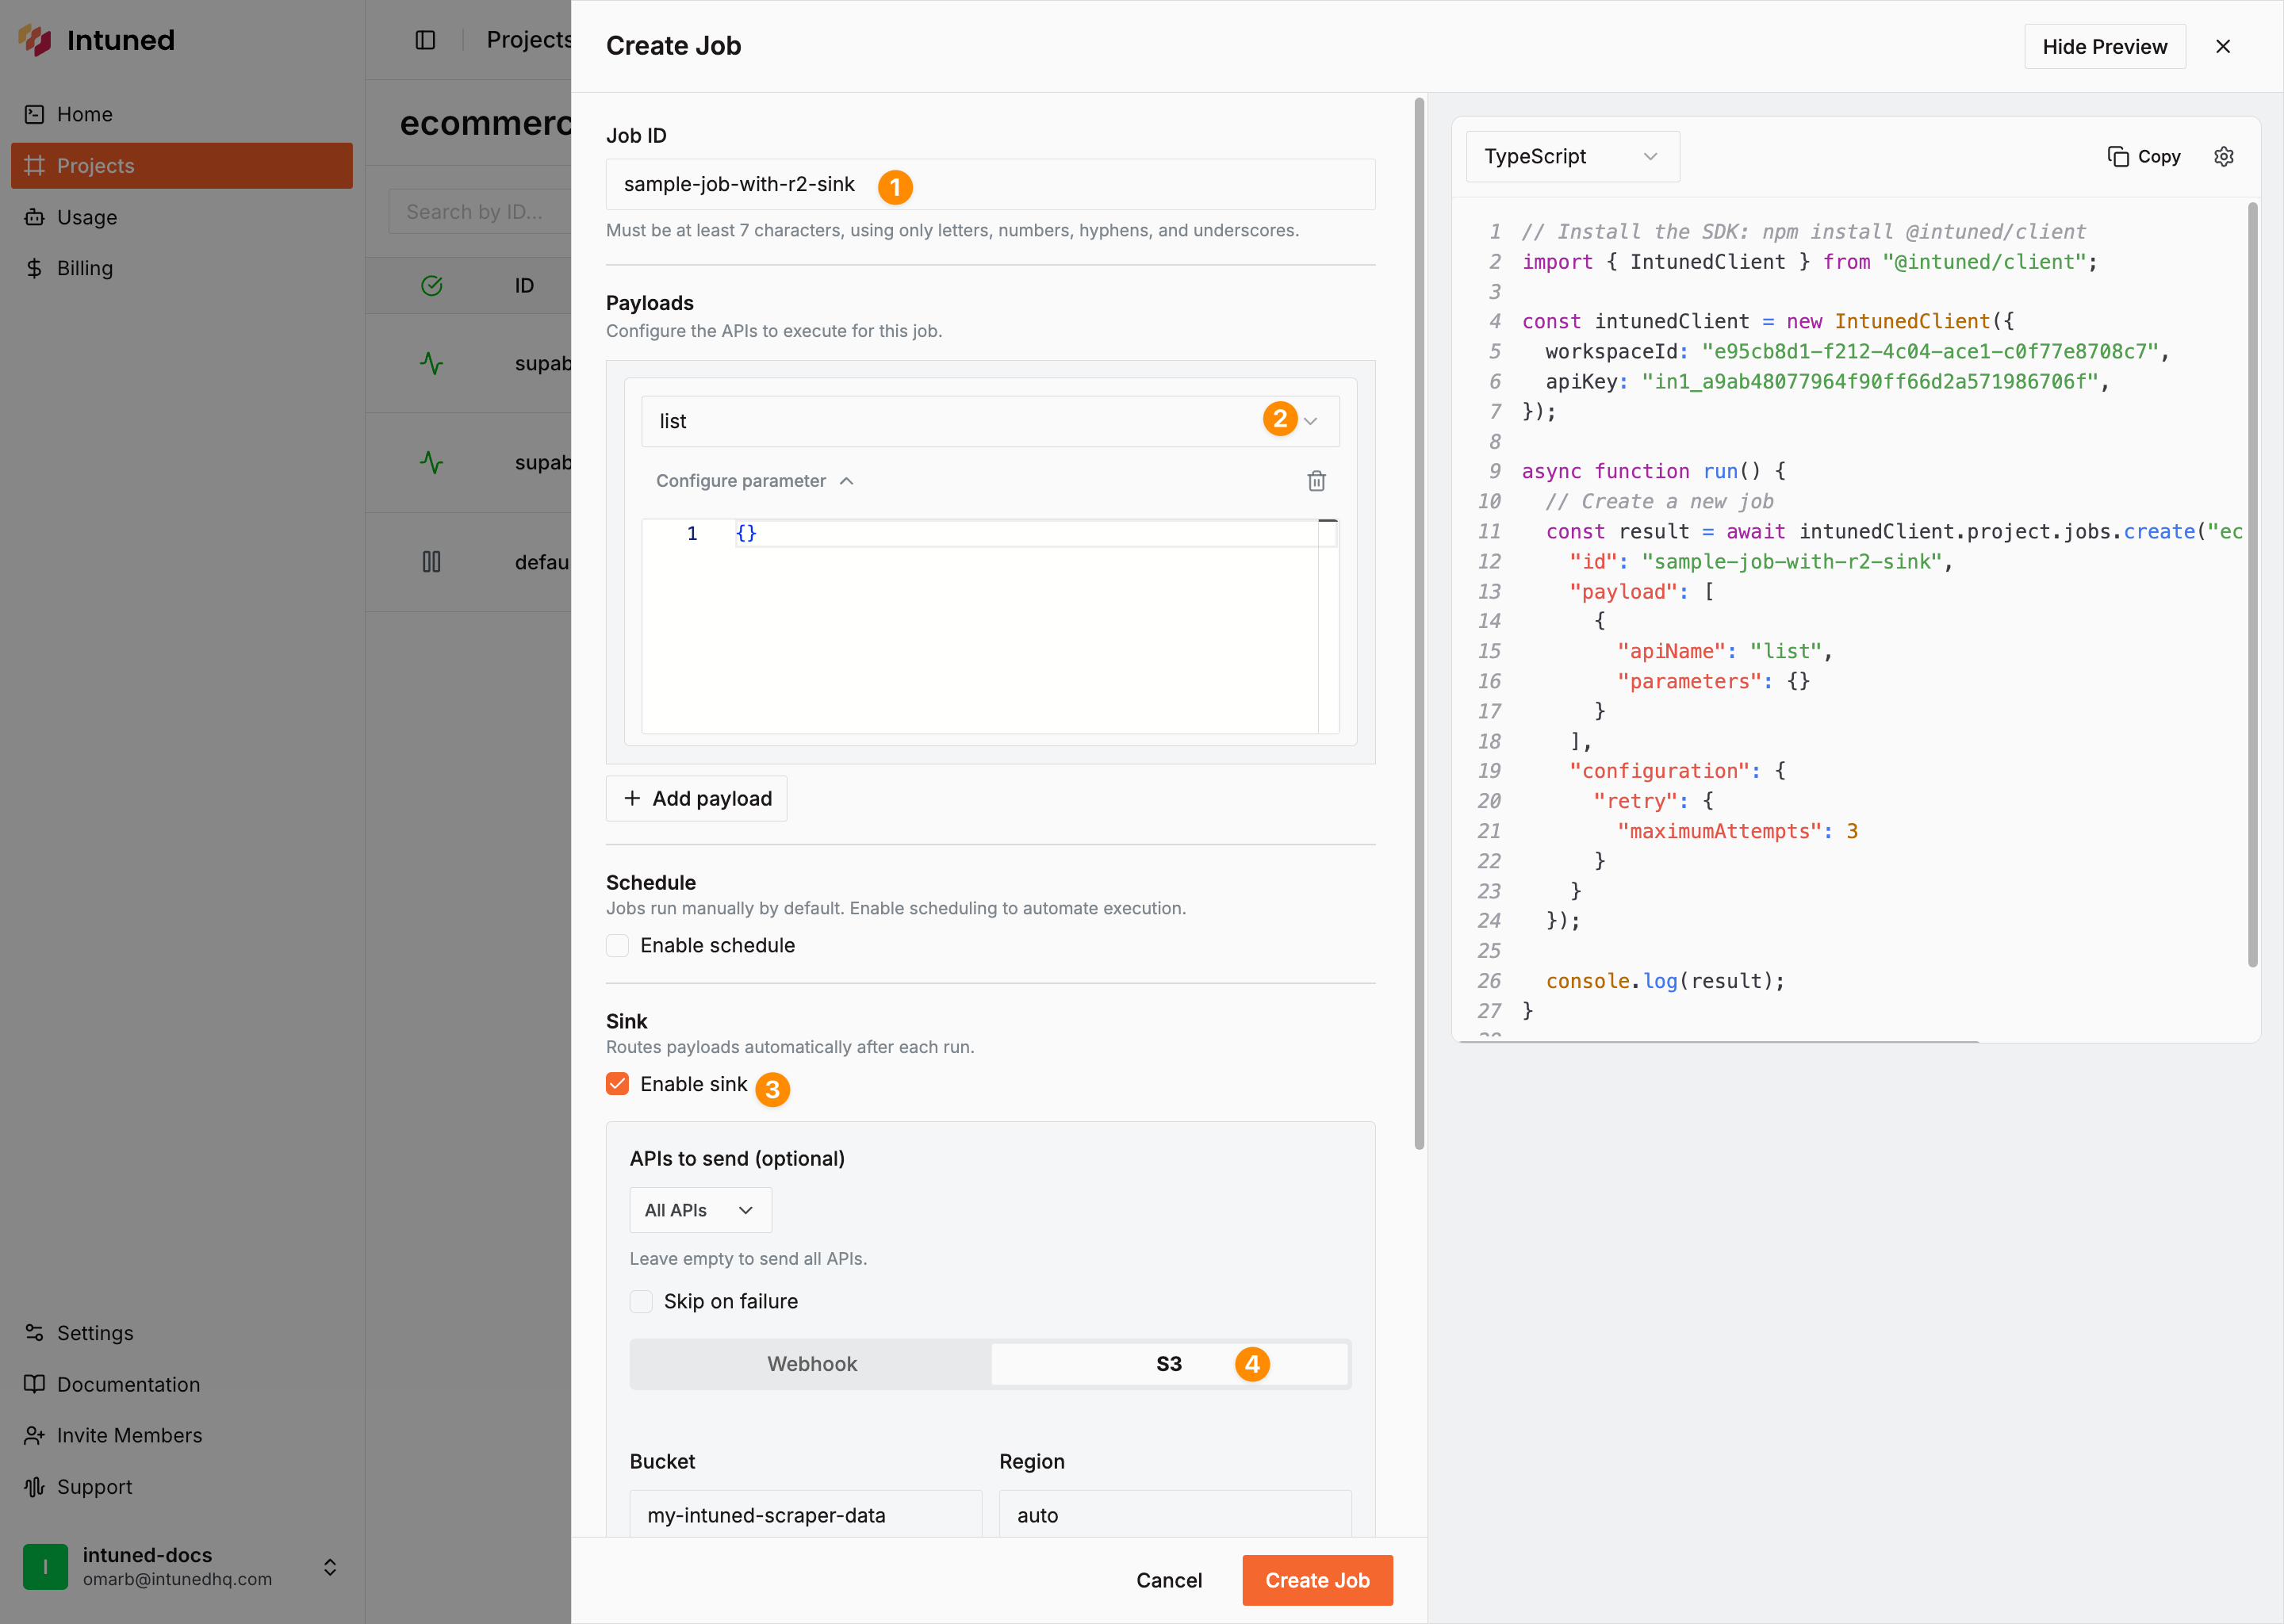
- Select Save to create the Job.
Trigger the Job
- Dashboard
- TypeScript SDK
- Python SDK
- In the Jobs tab, find the Job you created
- Select … next to the Job
- Select Trigger
Inspect data in R2
After the Job completes, view your scraped data in R2:
- Navigate to the Cloudflare Dashboard → Storage & databases > R2 object storage > Overview
- Open your bucket (e.g.,
my-intuned-scraper-data) - Navigate to your prefix path if you specified one (e.g.,
ecommerce-data/)
- Job sink:
{prefix}/{jobId}/run-{jobRunId}/{apiRunId}.json - Run sink:
{prefix}/runs/{apiRunId}.json
- One JSON file per API Run
- The initial
listAPI Run has one file - Each
detailsAPI Run (created byextendPayload) has its own file
View sample R2 file content
View sample R2 file content
- Job starts immediately - Visible in Intuned dashboard
- API Runs execute - The
listAPI runs first, thendetailsAPIs for each product - Files written to R2 - When each API Run completes, Intuned writes a JSON file to your bucket
Configuration options
For full details on S3-compatible sink configuration, see the S3 Sink API Reference. Key configuration fields for R2:| Field | Required | Description |
|---|---|---|
type | Yes | Must be "s3" (R2 uses S3-compatible API) |
bucket | Yes | R2 bucket name |
endpoint | Yes | R2 endpoint: https://<account_id>.r2.cloudflarestorage.com |
accessKeyId | Yes | R2 API token access key |
secretAccessKey | Yes | R2 API token secret key |
forcePathStyle | Yes | Must be true for R2 |
prefix | No | Path prefix for organizing files |
skipOnFail | No | Skip writing failed Runs (default: false) |
apisToSend | No | List of specific API names to send |
Processing data from R2
Once data lands in R2, process it using Cloudflare Workers—a common pattern for serverless data pipelines. Workers run at the edge with zero-latency access to R2 and no egress fees. Alternatively, use R2 Event Notifications to trigger workflows, or access data via the S3-compatible API from any programming language or tool (AWS CLI, boto3, aws-sdk).Best practices
- Organize data with prefixes: Use meaningful prefix structures like
{environment}/{project-name}/{date}/to make data easier to find, manage, and process. - Use Cloudflare Workers for processing: Workers have zero-latency access to R2 data with no egress fees. Use them to transform, filter, or aggregate data at the edge before storing or forwarding.
- Monitor R2 usage: Check the R2 dashboard for storage usage and request counts. Set up alerts for storage thresholds and track API request patterns.
Troubleshooting
Endpoint connection errors
Cause: Incorrect Account ID in endpoint URL, missing or malformed endpoint field, or typo in URL format. Solution: Find your Account ID in the Cloudflare dashboard URL (https://dash.cloudflare.com/<account-id>/r2). Verify endpoint format is exactly https://<account-id>.r2.cloudflarestorage.com with no trailing slash or extra paths.
forcePathStyle errors
Cause: Missing or incorrectforcePathStyle setting. R2 requires path-style URLs, not the virtual-hosted-style URLs that AWS S3 uses by default.
Solution: Ensure forcePathStyle is set to true in your sink configuration. This field is required for R2 to work correctly.
Job paused: “Failed to write to S3 sink”
Cause: Intuned automatically pauses the Job when it fails to write data to R2. Common reasons include invalid or expired API token, incorrect R2 endpoint format, missingforcePathStyle: true setting, insufficient token permissions, or the bucket doesn’t exist.
Solution: Check the Job status in the Intuned dashboard (shows as “Paused”). Fix the underlying issue by verifying R2 credentials, confirming endpoint format, ensuring forcePathStyle is true, and checking token permissions include Object Read & Write. Test credentials with aws s3 ls s3://your-bucket --endpoint-url=https://your-account-id.r2.cloudflarestorage.com. Update the Job configuration if needed, then select Resume from the dashboard. The Job continues from where it paused.
Related resources
S3 Sink API Reference
S3-compatible API documentation that works with R2
Jobs
Learn more about creating and managing batched Job executions
Deploy your first scraper
Complete the quickstart tutorial to set up your first scraping project
AWS S3 Integration
Compare R2 with AWS S3 integration and setup differences